当一个对象在css里用了float后会导致下一个对象重叠,原因是一旦float了那么它本身就不再加入原来的高度等一系列计算,如果要解决这个问题,就是在下一个对象之前加入一个用来使它进入计算的对象,也就是一个包含clear: both样式的对象,举个例子:
<div style="float: right">…</div>
<div style="clear: both">…</div>
实际上并非是标签无效,而是在引用css的时候多加了media="screen"这一段,比如:
<link rel="stylesheet" type="text/css" href="../Public/css/bootstrap.min.css" media="screen">
因为media="screen"导致Chrome内核不去识别用了@media print的css。
解决办法很简单,去掉引用语句中的media="screen"即可。
全文转载整理自互联网,感谢原作者。
其实只需要一行CSS代码
-webkit-overflow-scrolling : touch;
实际上Safari真的用了原生控件来实现,对于有-webkit-overflow-scrolling的网页,会创建一个UIScrollView提供子layer给渲染模块使用。创建时的堆栈如下:
Thread 1, Queue : com.apple.main-thread
#0    0x00086723 in -[UIScrollView initWithFrame:] ()
#1    0x004ec3bd in -[UIWebOverflowScrollView initWithLayer:node:webDocumentView:] ()
#2    0x001f1769 in -[UIWebDocumentView webView:didCreateOrUpdateScrollingLayer:withContentsLayer:scrollSize:forNode:allowHorizontalScrollbar:allowVerticalScrollbar:] ()
#3    0x01d571bd in __invoking___ ()
#4    0x01d570d6 in -[NSInvocation invoke] ()
#5    0x01d5724a in -[NSInvocation invokeWithTarget:] ()
#6    0x027fb6a1 in -[_WebSafeForwarder forwardInvocation:] ()
#7    0x027fb8ab in __44-[_WebSafeAsyncForwarder forwardInvocation:]_block_invoke_0 ()
#8    0x04ac753f in _dispatch_call_block_and_release ()
#9    0x04ad9014 in _dispatch_client_callout ()
#10    0x04ac97d5 in _dispatch_main_queue_callback_4CF ()
#11    0x01d09af5 in __CFRunLoopRun ()
#12    0x01d08f44 in CFRunLoopRunSpecific ()
#13    0x01d08e1b in CFRunLoopRunInMode ()
#14    0x01cbd7e3 in GSEventRunModal ()
#15    0x01cbd668 in GSEventRun ()
#16    0x00032ffc in UIApplicationMain ()
#17    0x00002ae2 in main at /Users/liuhx/Desktop/UIWebView_Research/WebViewResearch/main.mm:16
实际创建的是UIWebOverflowScrollView,它继承自UIScrollView,声明为:
@class DOMNode, UIWebDocumentView, UIWebOverflowContentView, UIWebOverflowScrollListener;

@interface UIWebOverflowScrollView : UIScrollView
{
    UIWebDocumentView *_webDocumentView;
    UIWebOverflowScrollListener *_scrollListener;
    UIWebOverflowContentView *_overflowContentView;
    DOMNode *_node;
    BOOL _beingRemoved;
}

@property(nonatomic, getter=isBeingRemoved) BOOL beingRemoved; // @synthesize beingRemoved=_beingRemoved;
@property(retain, nonatomic) DOMNode *node; // @synthesize node=_node;
@property(retain, nonatomic) UIWebOverflowContentView *overflowContentView; // @synthesize overflowContentView=_overflowContentView;
@property(retain, nonatomic) UIWebOverflowScrollListener *scrollListener; // @synthesize scrollListener=_scrollListener;
@property(nonatomic) UIWebDocumentView *webDocumentView; // @synthesize webDocumentView=_webDocumentView;
- (void)setContentOffset:(struct CGPoint)arg1;
- (void)_replaceLayer:(id)arg1;
- (void)prepareForRemoval;
- (void)fixUpViewAfterInsertion;
- (id)superview;
- (void)dealloc;
- (id)initWithLayer:(id)arg1 node:(id)arg2 webDocumentView:(id)arg3;

@end
其还有一个子View作为ContentView,是给WebCore真正用作渲染overflow型内容的layer的容器。
UIWebOverflowContentView的声明为:
@interface UIWebOverflowContentView : UIView
{
}

- (void)_setCachedSubviews:(id)arg1;
- (void)_replaceLayer:(id)arg1;
- (void)fixUpViewAfterInsertion;
- (id)superview;
- (id)initWithLayer:(id)arg1;

@end
再往底层跟,都是CALayer的操作。
以上两个类都是UIKit层的实现,需要WebCore有硬件加速的支持才有实际意义,相关的逻辑被包含在ACCELERATED_COMPOSITING这个宏里。从SVN log看,在WebKit 108400版本左右才支持,所以iOS Safari应该是需要5.0,Android只在4.0以上支持。从前端开发的角度讲,只需要知道CSS的属性-webkit-overflow-scrolling是真的创建了带有硬件加速的系统级控件,所以效率很高。但是这相对是耗更多内存的,最好在产生了非常大面积的overflow时才应用。
有的时候在界面里想要做个漂亮的弧形边用来美观单一不变的矩形框。简单的顶点控制并不能很好实现想要的效果,用图片又不够完美,且多了加载项。那怎么用CSS来实现弧形呢?
先说一下原理,其实我们需要实现的是截取圆的小部分弧边,那么就首先要画一个足够大的圆,然后再在其中选取我们需要的截段,把其他部分隐去即可,一共也就两步。这里我们需要用到::after伪类。
先画个框作为容器,CSS代码如下:
#div_headContainer {
            -webkit-border-radius: 5px;
            -moz-border-radius: 5px;
            border-radius: 5px;
            margin: 5px;
            padding: 0 0 8px 0;
            height: 150px;
            border: darkgray 1px solid;
}
再在里面套个小框,是我们用来做圆的容器,CSS代码如下:
#div_headContainerBackground {
            width: 100%;
            height: 100%;
            position: relative;
            overflow: hidden;
            padding: 10px 10px 0 10px;
}
接下去就是关键了,我们使用:after伪类来实现背景:
#div_headContainerBackground::after {
            content: '';
            width: 160%;
            height: 100%;
            position: absolute;
            left: -30%;
            top: 0;
            z-index: -1;
            border-radius: 0 0 50% 50%;
            background: -webkit-linear-gradient(left, #1ecec2, #1ad17a); /* Safari 5.1 - 6.0 */
            background: -o-linear-gradient(right, #1ecec2, #1ad17a); /* Opera 11.1 - 12.0 */
            background: -moz-linear-gradient(right, #1ecec2, #1ad17a); /* Firefox 3.6 - 15 */
            background: linear-gradient(to right, #1ecec2, #1ad17a); /* 标准的语法(必须放在最后) */
}
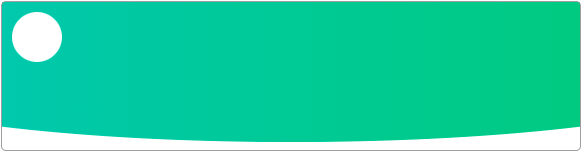
效果如下,可以直接查看HTML代码。在这过程中,在元素后追加一个after,元素自身定位为relative,伪类设置content: '',并相对定位为absolute,再设置下left、top值,使伪类元素的位置摆放的合理。这里需要注意的是把z-index值设为-1,因为弧形一般是作为背景图,层级自然要放低些。